Importing Records from Third Party Systems
The Import option available in Imprivata Privileged Access Management (PAM) allows any permitted user (Editor, Owner or System Administrator) to import their existing records and connections from several popular sources, including CSV, Remote Desktop Connection Manager and PuTTY.
During the import process, the folders and records contained within your files will be created in PAM using their commonly shared parameters like name, description, host and port.

This will assist in getting users to more quickly adopt Access Manager as the interface will look like an experience in which they are familiar.
The following Import options are currently supported:
- Import from a CSV File (can be used for mRemote and other connection manager “Export to CSV” options)
- Import from a Remote Desktop Connection Manager save file (.rdg)
- Import from an exported PuTTY file (.reg)
- Import from an exported KeePass version 2 file (.xml). More here.
If you would like to discuss other import options, please contact our Support Team https://support.imprivata.com/.
There is also an Import Overwrite option to configure the software to support existing records of the same name.
CSV file
To import from CSV file:
- Create your own CSV file using this attached file as an example. Please take particular notice of the CSV headers as those are required in order for the Import to process.
- Login to PAM and either create a new folder or navigate to an existing folder that will serve as your root import location. NOTE: If you do not create or use a folder, then all objects will be imported to the Root Folder.
- Click Import to begin the process.
- Click the Select File button and load your .csv file.
- Click Import to begin the process.
- When it is complete, a log will be generated to show the status of each folder and record. Please review this log to ensure all objects were created successfully.
- Return to the import location to begin using your new records.
The headers in the CSV upload file must match an existing field name available in your chosen Record Type. For example, if you want to upload a value to a field named Service, then this field Service must already exist as part of your selected Record Type and you must include Service in the CSV header as a column.
Note: vault can be imported on Root folder level only. Vault cannot be imported to another folder or vault.
To import objects with difficult structures such as folder/folder/record or vault/folder/record, parent objects should be separated using "/ ".
To import a file you should write path to the record like this: file:Disk:\path\to\file for example, file:D:\CSVImport-CertFiles\certificate.cer.
RDC Manager save file
To import from Remote Desktop Connection Manager save file:
- Open Remote Desktop Connection Manager and save your session as a .rdg file.
- Login to PAM and either create a new folder or navigate to an existing folder that will serve as your import location. NOTE: If you do not create or use a folder, then all objects will be imported to the Root Folder.
- Click import to begin the process.
- Click the Select File button and load your .rdg file.
- Click Import to being the process.
- When it is complete, a log will be generated to show the status of each folder and record. Please review this log to ensure all objects were created successfully.
- Return to the import location to being using your new records.
PuTTY export file
To import from PuTTY export file:
- Save your PuTTY session to a .reg file.
- Login to PAM and either create a new folder or navigate to an existing folder that will serve as your import location. NOTE: If you do not create or use a folder, then all objects will be imported to the Root Folder.
- Click import to begin the process.
- Click the Select File button and load your .reg file.
- Click Import to being the process.
- When it is complete, a log will be generated to show the status of each folder and record. Please review this log to ensure all objects were created successfully.
- Return to the import location to being using your new records.
Import a KeePass v2 Export
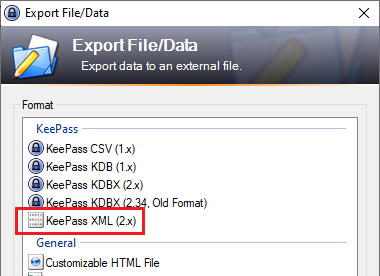
- Create your KeePass version 2 export using its native Export option. When exporting, you may either export the entire Database or a selected Group, use the format KeePass XML (2.x).
-
After the export has been generated, login to PAM with either a System Administrator account or Owner to the folder that will be used for Import.
-
Navigate into the System folder (or vault) that will be the import location and select the Manage > Import option from this folder’s toolbar.

-
Click Select File to then choose your KeePass .xml export file for import.
-
Finally, click the Import button to begin the process.
Please note that exported Remote Desktop Connection Manager and PuTTY sessions use encryption for passwords, certificates and keys. Due to the possibility of someone using PAM as a means of decryption, these fields will not be included with our Import process and as a result, any record that contains one of these fields will need to edited to include their value before it can be used in PAM.
Import Overwrite Behavior
When importing records, you must also select the overwrite option that best supports your requirements.
Each option outlines how PAM will process existing records during import.
For the purpose of Import Overwrite, existing records are defined by having an exact Record Name match in the same location as on object from the import file. The available options are:
-
Create
The Create option does not check for existing records when importing new records. This is the fastest option; however, this option might create duplicate records when importing to an existing record hierarchy.
-
Skip (slower)
The Skip option detects existing records during the import process and skips them from import while only importing new, non-existing records. Skip is slower than the Create option in detecting existing records; however, it might provide better overall performance in cases when most of the records in the import file already exist in this location.
-
Update (slowest)
The Update option detects existing records during the import process and updates the first found match for each existing record with the values from the import file generating a record update event. This import option also creates new records when matching existing records are not found. This option is the slowest one for the import process.
Dry Run for CSV, KeePass, RDG and PuTTY files
For Import of the objects from CSV, KeePass, PuTTY or Remote Desktop Connection Manager files to your Records you can use Dry Run.
The option runs the Import process and reports issues as the regular import process without actually creating objects in the system.
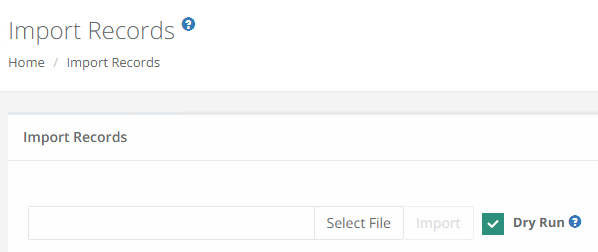
To be sure your objects have no errors, we recommend you to use Dry Run.
Dry Run does not consider any of the Import Overwrite options for its evaluation. It only evaluates the values of each object from the import file.
To Dry Run your objects:
-
Go to Records > Manage > Import.
-
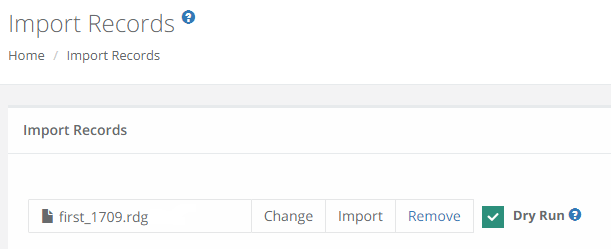
Add the object to the field, and touch the check-box with the Dry Run.
-
Press the Import button.
-
Now you can see the Status of the objects.
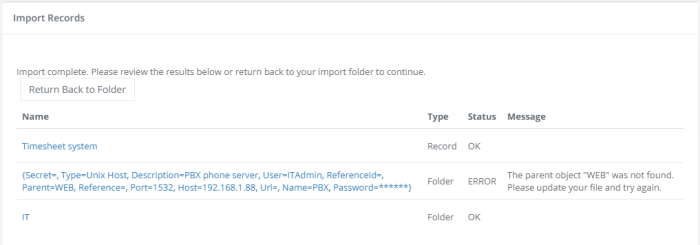
Note: the objects with errors can be imported as well.
if the objects for Import are OK:
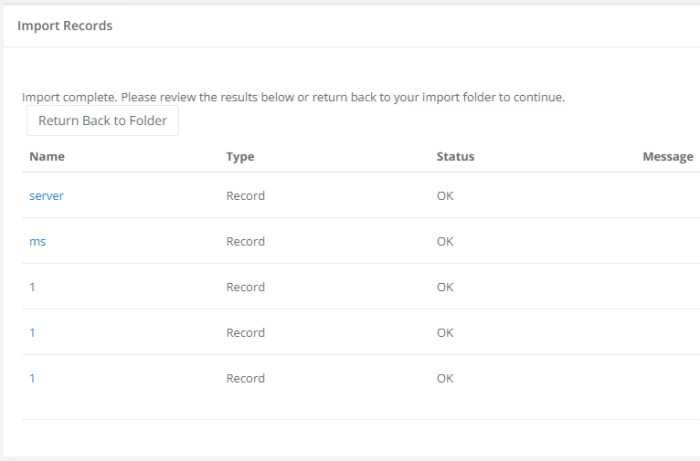
Note: if you choose Dry Run option, PAM creates no objects in the file system. To Import these objects you need to choose the object and press the Import button.
Dry Run is unchecked by default.